TBD
How do I transfer my Hughes.net email?
As of 11/16/26, your hughes.net email address and the hughes.net email platform will be retired.
To prepare for this change, you’ll need to choose the email address you plan to use going forward and transfer any emails, contacts, and other information you’d like to keep.
Before You Begin
- Choose the email address you plan to use going forward. Popular options include Gmail®, Outlook®, and Yahoo®.
- Most transfer methods require a desktop or laptop.
- Keep any exported email files until you have verified that your transfer is complete.
- Complete these steps before 11/16/26.
Recommended: Gmail provides a simple transfer experience for most customers and is our recommended option.
Choose your Email provider
View instructions to transfer your hughes.net emails to Gmail® here.
View instructions to transfer your hughes.net emails to Outlook® here.
View instructions to transfer your hughes.net emails to Yahoo® here.
After You Transfer Your Email
Most transfer methods require a desktop or laptop. Create your new email account before starting the transfer process. Keep any exported email files until you have verified your transfer is complete.
Important Reminder
We encourage you to begin soon so you have time to complete these steps before 11/16/26.
After this date, you will no longer be able to access your hughes.net emails or the hughes.net email platform. New emails sent to your hughes.net email address will not be delivered. Email forwarding will also end.
How do I transfer my Hughesnet email messages to Outlook?
This guide will walk you through each step of the process. You’ll first download your existing Hughes.net email messages, then import them into Outlook® so they’re available in your new account. Just follow the instructions below to get started.
| Before you begin: You will need a laptop or a computer as email migration won’t work on your phone. You will need your Hughesnet username and password. You will also need the New Outlook® application and an Outlook® account, if you do not have it installed, please download it from here |
If you do not already have an Outlook account
Create a free Outlook® account before continuing:
- Open the Microsoft Outlook® website and select Create free account.
- Choose the Outlook® email address you want to use. If it is unavailable, choose another address.
- Create a strong password and enter the requested account information.
- Complete the identity verification steps.
Part 1: Export your email from Hughesnet
1. Open Hughesnet Email
Go to myhughesnet.com and sign in with the Hughes.net username and password associated with the mailbox you want to move. From the top of the page, select My Email. The Hughes.net Email page opens.
2. Open Email settings
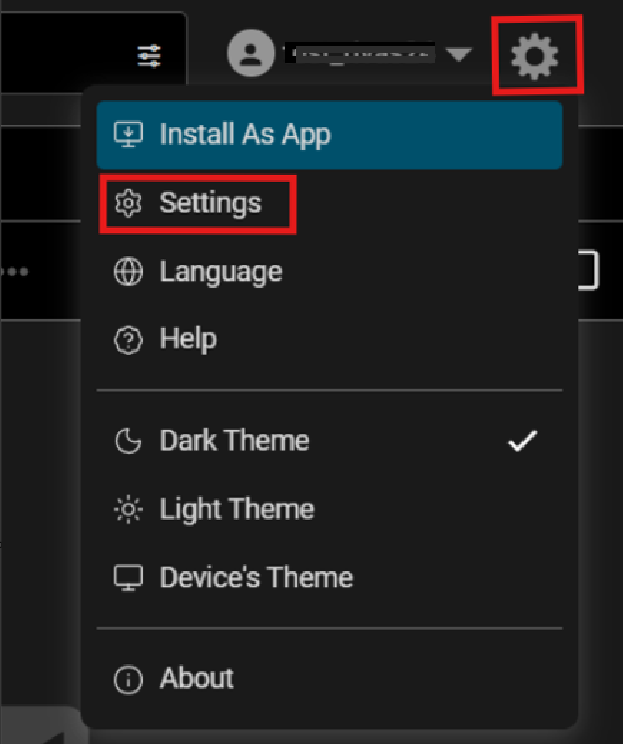
On the Hughes.net Email page, select the Settings icon in the upper-right corner. From the menu, select Settings.
3. Choose the email account
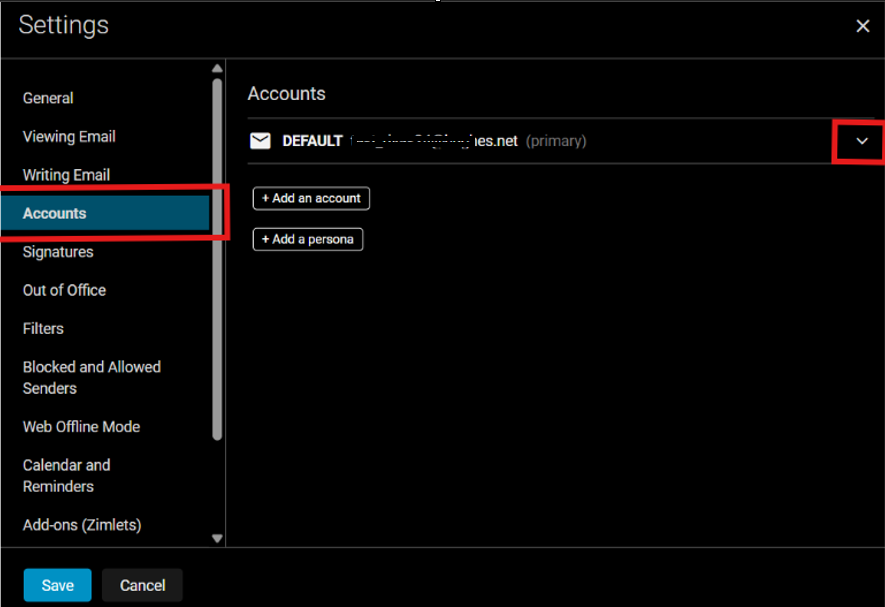
In Settings, select Accounts. Find the account you want to export, and select the downward arrow beside that account to expand its options.
4. Export the mailbox
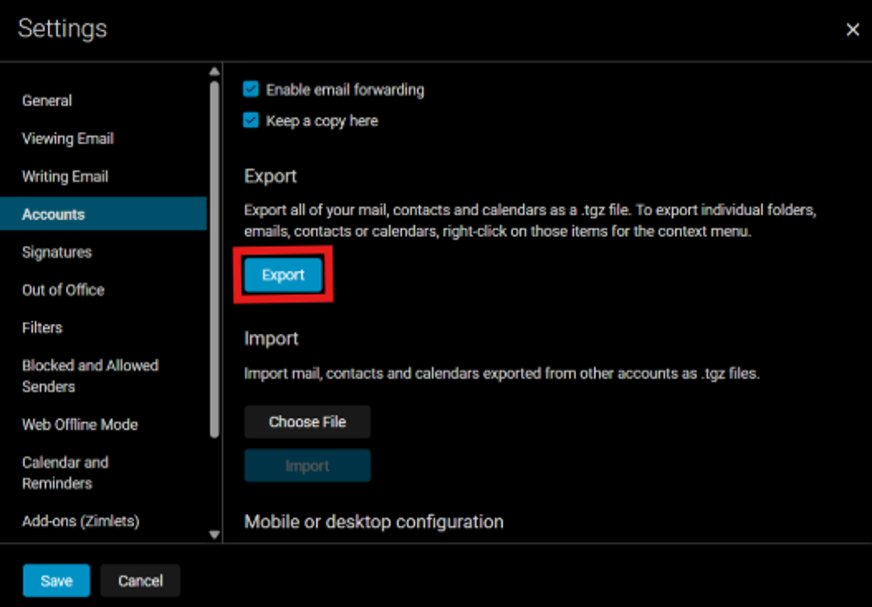
Scroll down to the Export section and select Export. This step downloads your mail, contacts, and calendars as a .tgz archive file. The file is typically saved in your Downloads folder.
| What happens next? The downloaded archive must be extracted before Outlook® can import the email messages. After extraction, the email folders contain .eml files. |
5. Extract the downloaded archive
Open your File Explorer and go to the folder where the download was saved. Right-click the downloaded archive and select Extract All. Choose a folder that is easy to find and complete the extraction.
Part 2: Import the Hughesnet emails into the new Outlook
6. Open the new Outlook
Download and open the new Outlook® application if it is not already installed. Sign in with the Outlook® account that will receive the Hughes.net messages.
7. Open Account info
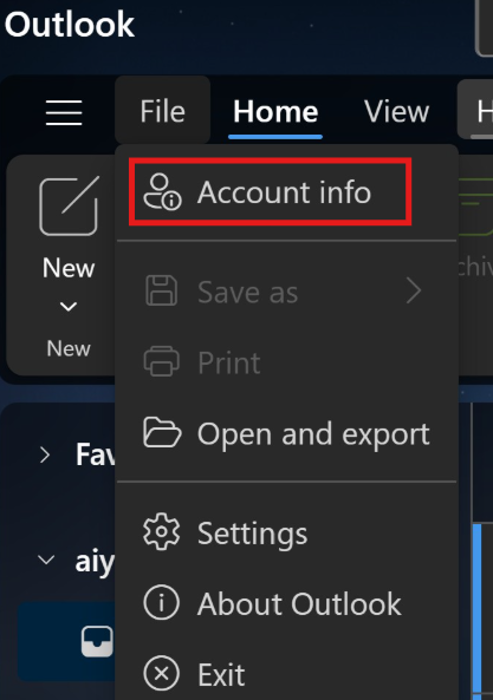
In the upper-left corner of Outlook®, select File, and then select Account info.
8. Start the .eml import
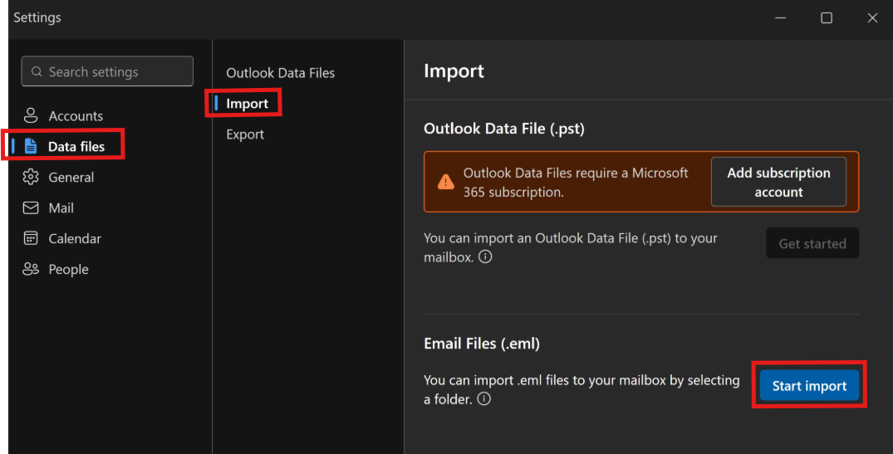
In Settings, select Data files. Under Import, find Email Files (.eml) section, and select Start import. It will open your file explorer.
9. Choose the Hughesnet email folder
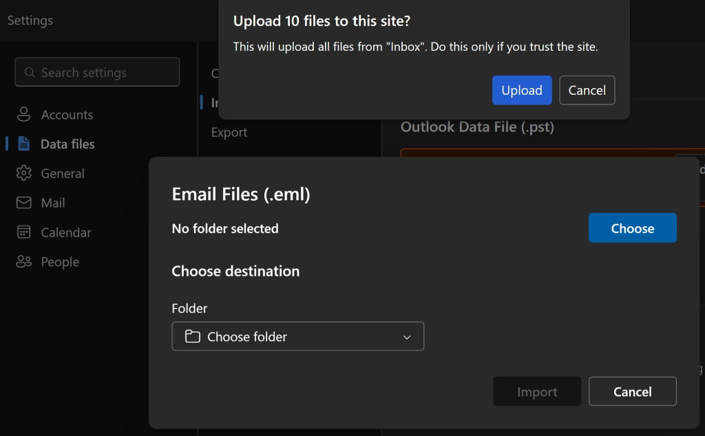
Browse the folder you extracted earlier. Select the Inbox folder and select Upload, and then select Upload again when Outlook® asks permission to upload the files.
10. Choose where the messages will go
Under Choose destination, select an existing Outlook® folder or select Create a new folder. A separate folder, such as Hughes.net Inbox, can make the imported messages easier to find.
11. Import the messages
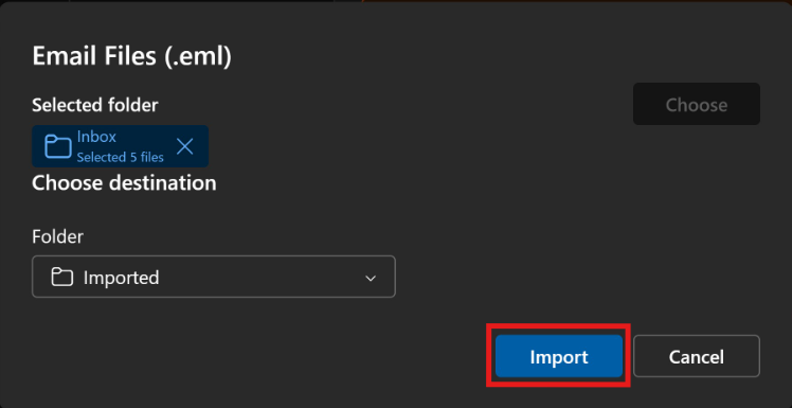
After confirming both the selected source folder and destination folder, select Import.
12. Confirm the import and repeat for Sent/Draft messages
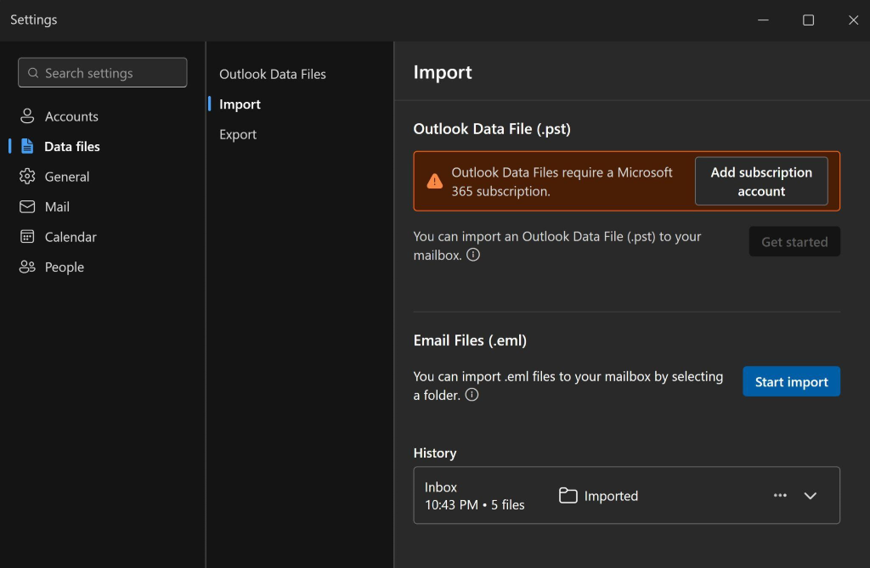
When the import finishes, the result appears under History. Open the destination folder and confirm that the messages are present. To import sent messages, repeat steps 8 through 11 and choose the Sent or Drafts folder from the extracted Hughes.net email archive.
Note: The migration process may take anywhere from a few minutes to an hour, depending on the size of your inbox. Please allow some time for the migration to complete before checking for your emails.
How can I confirm that the migration worked?
- Open the destination folder in Outlook® and confirm that messages appear.
- Keep the original downloaded archive until you finish checking the imported email.
Related FAQs:
View instructions to transfer your hughes.net emails to Gmail® here.
View instructions to transfer your hughes.net emails to Yahoo® here.
How do I transfer my Hughes.net email to Yahoo Mail?
This guide will walk you through each step of the process. You’ll first download your existing Hughes.net email messages, then import them into Outlook® so they’re available in your new account. Just follow the instructions below to get started.
Note: Yahoo® Mail does not offer a direct email import tool. As a workaround, you can use the new Outlook® application to transfer your Hughes.net emails into Yahoo® Mail. You do not need an Outlook® email address. Just install the new Outlook® app, connect your Yahoo® account, and import your exported Hughes.net emails into your Yahoo® folders.
| Before you begin: This process must be completed using a desktop or laptop. Several steps require File Explorer, extracting downloaded files, and the Outlook® desktop application, which are not available on phones, tablets, or within mobile email apps. |
Part 1: Set up Yahoo in the new Outlook
Step 1: Create a Yahoo account, if needed
If you do not have a Yahoo® account, open Yahoo Mail, select Create account, and complete the registration and verification prompts. If you already have a Yahoo® account, confirm that you can sign in.
Desktop required: The new Outlook® application is a desktop application. If you are currently using a phone or tablet, switch to a desktop or laptop before continuing.
Step 2: Install the new Outlook and add Yahoo
Install and open the new Outlook®. Enter your Yahoo® email address and select Continue. If you do not have the new Outlook® Download the new Outlook.
Note: If you are already logged into the new Outlook® using the Outlook® email, click on File > Account Info. Under Accounts > Your Accounts > Click Add Account and enter your Yahoo® email and Select Continue.
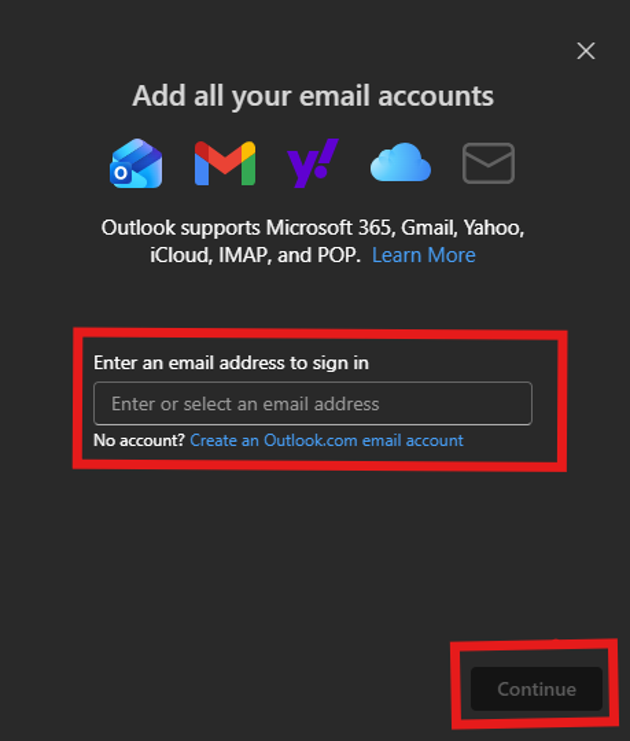
Step 2: Install the new Outlook® and add Yahoo
Step 3: Complete Yahoo sign-in
Follow the Yahoo® prompts in the web browser. Select Continue, confirm your Yahoo® address, enter your Yahoo® password, accept the permissions, and return to Outlook®. Confirm that your Yahoo® email address appears in the left navigation pane.
| Checkpoint: Do not continue until your Yahoo® email address appears in Outlook®. |
Part 2: Export your Hughesnet email
Step 4: Open Hughes.net Email
Go to myhughesnet.com and sign in with the Hughes.net username and password associated with the Hughes.net mailbox you want to move. Select “My Email” from the header.
Desktop required: The export process downloads an archive file to your computer. Using a desktop or laptop makes it easier to locate, manage, and verify the downloaded files.
Step 5: Export the mailbox
In Hughes.net Email, select Settings > Accounts. Expand the account, scroll to Export, and select Export. The archive is normally saved in your Downloads folder in your device.
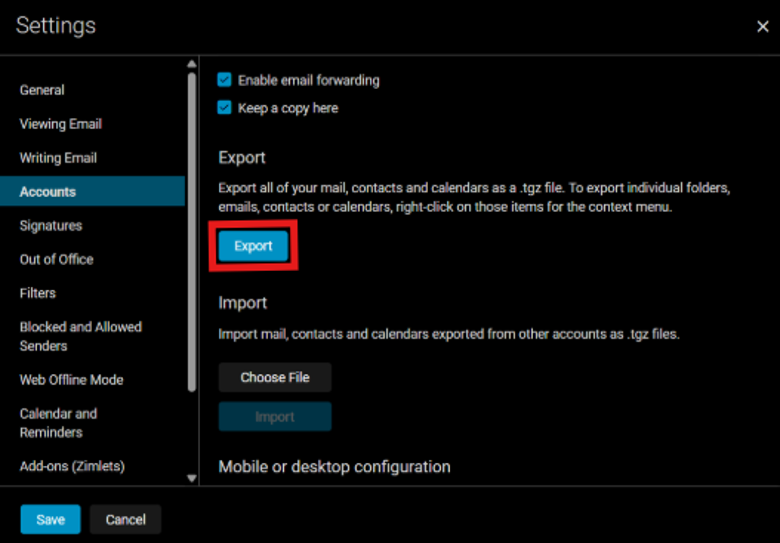
Step 5: Export the mailbox
Desktop required: This step uses Windows File Explorer to extract the downloaded archive. If you are not using a desktop or laptop, move to one before continuing.
Step 6: Extract the downloaded archive
In File Explorer, open “Downloads”. Right-click the downloaded archive and select “Extract All”. Save it somewhere easy to find. Keep the Inbox, Sent, Drafts, and other extracted folders together.
Part 3: Import Hughesnet email into Yahoo Mail
Step 7: Open the .eml import tool
In the new Outlook®, select File > Account info > Data files. Under Email Files (.eml), select Start import.
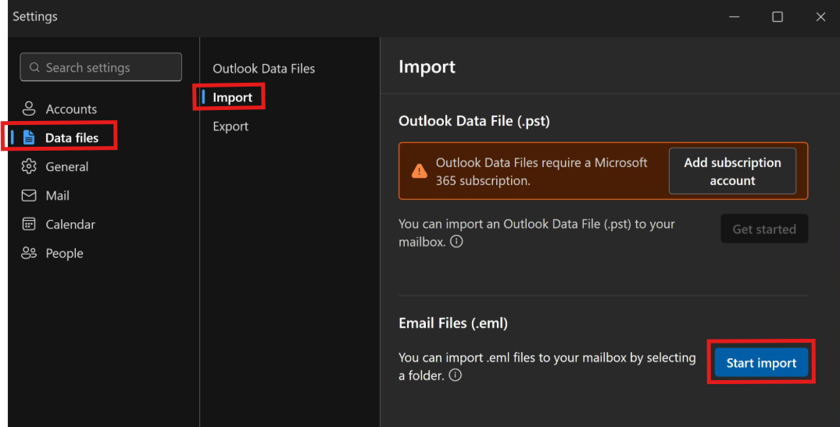
Step 7: Open the .eml import tool
Desktop required: The Outlook® import tool uses File Explorer to select folders from your computer. This process is designed for use on a desktop or laptop.
Step 8: Import Hughes.net folders into Yahoo
It will open your file explorer, browse for the extracted Hughes.net Inbox folder, and click Upload. Select “Upload” in the pop-up if prompted again. Under Choose destination, select a folder under your Yahoo® email address, such as Inbox or a new folder named Hughes.net Inbox. A separate folder, such as Hughes.net Inbox, can make the imported messages easier to find. Select “Import”. Repeat this step for Sent, Drafts, and any other folders you want to keep.
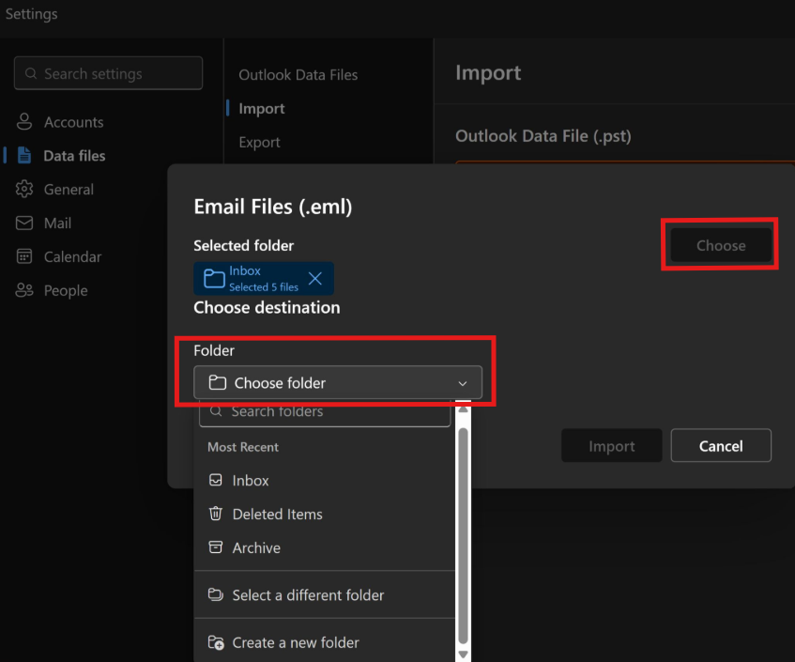
Step 8: Import Hughesnet folders into Yahoo
Step 9: Verify the migration
Review History on the Outlook® import page. Then sign in directly to Yahoo® Mail in a browser and confirm that the imported folders and messages are visible. Open several messages and check their dates, content, and attachments.
Note: The migration process may take anywhere from a few minutes to an hour, depending on the size of your inbox. Please allow some time for the migration to complete before checking for your emails.
| Important: Secure the downloaded Hughes.net archive and extracted folders until you have verified all required emails directly in Yahoo® Mail. |
Related FAQs:
Double your Priority Data Tokens—on us

Whether streaming, scrolling, or staying connected, extra data can go fast. That’s why this offer is too good to miss:
Buy 1 Data Token and get 2 FREE!*
That means 3 Priority Data Tokens for the price of 1, and you can stock up as much as you like.
Even better? Your Priority tokens never expire. They stay on your account and are ready whenever you need them—so you can plan ahead.
But don’t wait—this deal ends 8/31/26.
* Priority Data Tokens don’t expire and remain on your account until used. Allow up to 5 days for tokens to be applied. Offer valid through 8/31/26. Hughesnet® has No Hard Data Limits. If you exceed your plan data, you’ll stay connected, though speeds may slow during peak times. Streaming services may be affected. To restore speeds, purchase a Priority Data Token. Your account must be active, current, and in good standing with current balance less than or equal to $150. Tokens have no cash value. Check your balance on the ‘Usage’ page at myhughesnet.com. Terms apply.
Double your Data Tokens—on us

Whether streaming, scrolling, or staying connected, extra data can go fast. That’s why this offer is too good to miss:
Buy 1 Data Token and get 2 FREE!*
That means 3 Data Tokens for the price of 1, and you can stock up as much as you like.
Even better? Your tokens never expire. They stay on your account and are ready whenever you need them—so you can plan ahead.
But don’t wait—this deal ends 8/31/26.
* Allow up to 5 days for additional Data Tokens to be applied to your account. Promotion is applicable for Data Token purchases till 8/31/26. Your Hughesnet® account must be active and current (paid to date) to be eligible for the promotion. Data Token cannot be redeemed for cash value. View your Data Token balance on the ‘Usage’ page on myhughesnet.com. Eligibility for the free token promotion requires your Hughesnet account to be active, in good standing, and with current balance less than or equal to $150. Terms and conditions apply. Standard Data may be slower during high-traffic periods.
What should I do if I see the message, “Your account is flagged due to multiple invalid payment attempts. You must pay the overdue amount today and each monthly payment using an ACH transfer (bank account), a one-time bank wire transfer or a one-time pre-paid card”?
Q1: Why is my account flagged?
You are seeing this message because the system has detected several unsuccessful payment attempts or payment reversals (such as a chargeback from your bank).
Q2: What are my payment options?
To unlock your account, you must pay the full past-due balance and any future balances using any of the options below:
Option 1: ACH/Checking Account: Pay using your bank account and routing number. Click here for instructions on setting up ACH/Checking Account as your payment method.
Option 2: Non-Reloadable Pre-Paid Card: Pay with a pre-paid card (like a Visa or Amex gift card).
Option 3: Pay by Wire Transfer You can instruct your bank to send a wire transfer to Hughes Network Systems LLC. Provide your bank with the following information:
- Your Hughesnet Account #: (Make sure to include your specific DSS account number here)
- Bank Name: Bank of America
- Routing Number: 071000039
- Account Number: 8188701349
What should I do if I see the message, “Your account is flagged due to multiple invalid payment attempts. You must pay the overdue amount today and each monthly payment with a one-time bank wire transfer or a one-time pre-paid card.”?
Q1: Why is my account flagged?
You are seeing this message because the system has detected several unsuccessful payment attempts or payment reversals (such as a chargeback from your bank).
Q2: What are my payment options?
To unlock your account, you must pay the full past-due balance and any future balances using any of the options below:
Option 1: Non-Reloadable Pre-Paid Card: Pay with a pre-paid card (like a Visa or Amex gift card).
Option 2: Pay by Wire Transfer You can instruct your bank to send a wire transfer to Hughes Network Systems LLC. Provide your bank with the following information:
- Your Hughesnet Account #: (Make sure to include your specific DSS account number here)
- Bank Name: Bank of America
- Routing Number: 071000039
- Account Number: 8188701349
What should I do if I see the message, ” Your account is flagged due to multiple invalid payment attempts. You must pay the overdue amount today and each monthly payment using a credit card.”?
Q1: Why is my account flagged?
You are seeing this message because the system has detected several unsuccessful payment attempts or payment reversals (such as a chargeback from your bank).
Q2: What are my payment options?
To unlock your account, you must pay the full past-due balance. You have two options to make this payment:
Option 1: Pay by Credit Card This is the simplest way to pay your balance and restore service.
Option 2: Pay by Wire Transfer You can instruct your bank to send a wire transfer to Hughes Network Systems LLC. Provide your bank with the following information:
- Your Hughesnet Account #: (Make sure to include your specific DSS account number here)
- Bank Name: Bank of America
- Routing Number: 071000039
- Account Number: 8188701349
What is the Hughesnet Mesh Wi-Fi Node?
The Hughesnet® Mesh Wi-Fi Node is designed to extend your modem’s Wi-Fi signal, providing seamless wall-to-wall Wi-Fi coverage throughout your home. It pairs effortlessly with the Hughesnet Modem to ensure uninterrupted browsing and streaming in every room.
Do I Need a Mesh Wi-Fi Node?
You may benefit from a Mesh Wi-Fi Node if:
- You experience weak or no signal in certain areas of your home.
- You want to extend Wi-Fi coverage to additional structures like garages or guest houses. Use the myHughesnet (Mobile) app’s wireless signal gauge to help you identify places in your home with a poor signal.
How Does It Work?
The Hughesnet Mesh Wi-Fi Node extends your Wi-Fi coverage by repeating signals in weak connectivity areas. It receives signals from the main modem and redistributes them, eliminating dead zones for reliable, consistent coverage throughout your home. To use the Mesh Wi-Fi Node, you’ll need an HT3000W Satellite Modem, an active internet connection, and an electrical outlet near each node.
How Do I Order Mesh Wi-Fi Node?
You can purchase the Hughes Mesh Wi-Fi Node by logging into your account on myhughesnet.com under “Shop” menu.
Will I Need More Than One Mesh Wi-Fi Node?
The number of nodes required depends on:
- The size and layout of your home
- The construction materials (e.g., thick walls may require more nodes for optimal coverage)
- Use the myHughesnet (Mobile) app to detect weak signal areas and determine the number of mesh Wi-Fi nodes needed.
Where Should I Place My Mesh Wi-Fi Node?
For the best performance, place the mesh Wi-Fi node halfway between your Hughesnet modem and the area with poor signal strength. This positioning ensures you get maximum use of your mesh Wi-Fi node.