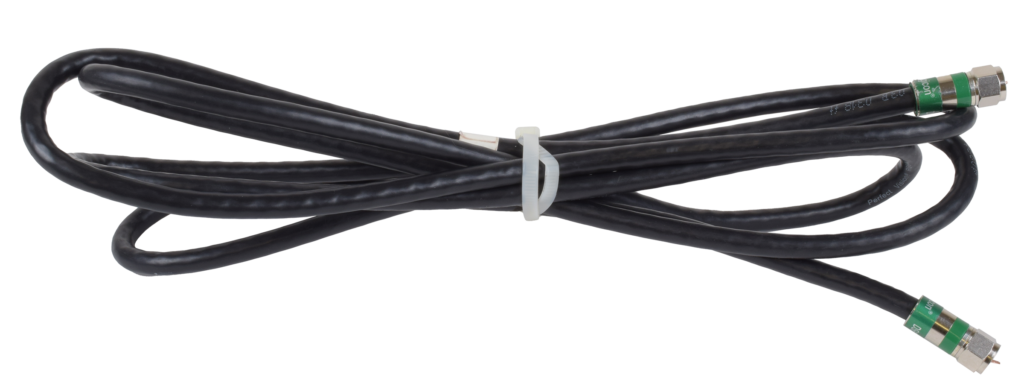
An IFL cable is a black coaxial cable coming from outdoor unit and is connected to the “SAT” port on the back of the modem.
Fig: IFL cable
Incorrect IFL cable connection can lead to issues with your internet service performance. The following FAQ will guide you to ensure the IFL cable is securely connected to your modem.
How to check if the IFL cable is connected correctly?
Check if the cable is intact and securely connected to the modem. To avoid electric shock, please refrain from touching the cable while the modem is powered ON.
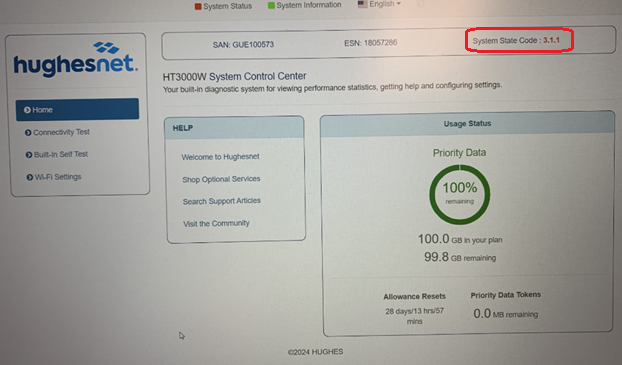
Once you are able to see that the cable is securely connected, visit http://www.systemcontrolcenter.com and check the state code. Note: Your device need to be connected to your Hughesnet® internet service.
If the “System State Code” is 3.1.1; it indicates that there is an issue with the IFL cable connection.
Fig: System Control Center showing “System State Code” of 3.1.1
Follow the instructions below to fix the issue. If not, the cable is properly connected and no further action is needed.
How to fix the IFL cable connection issue?
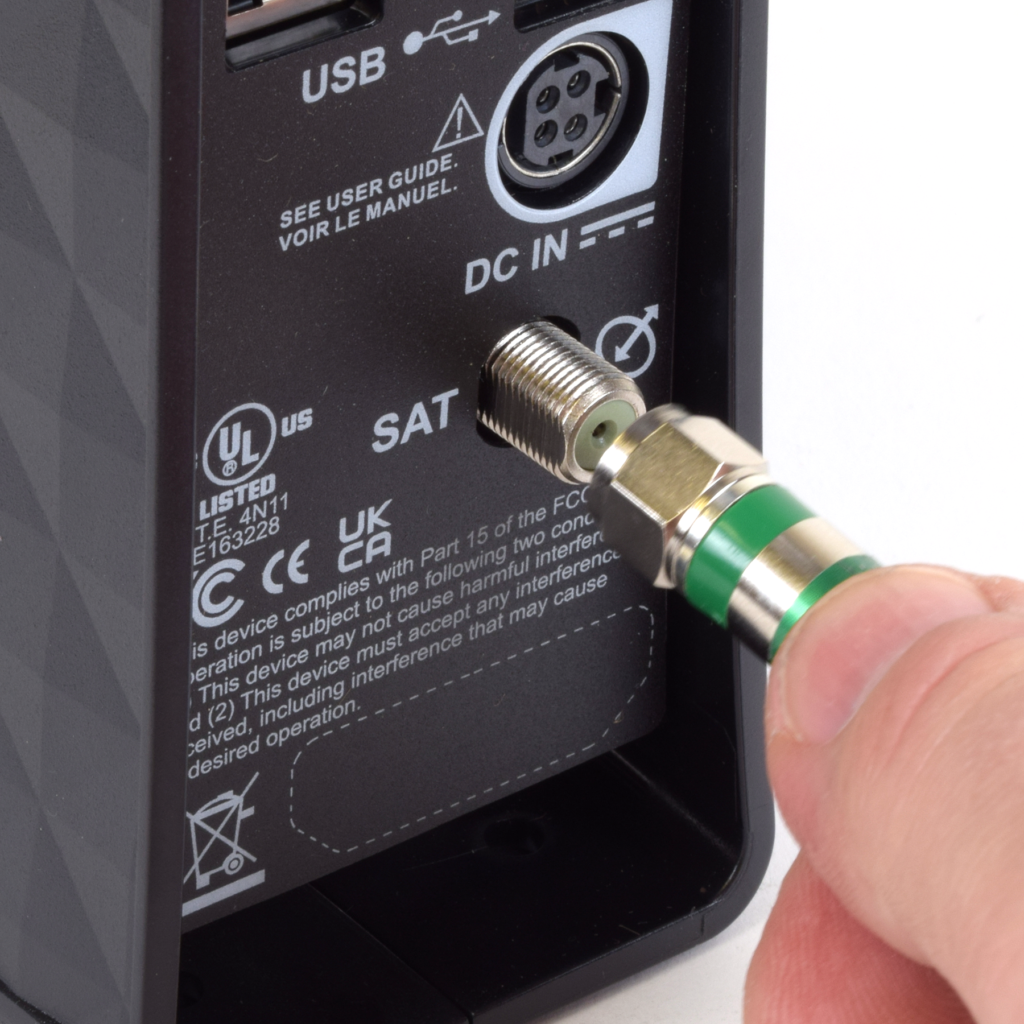
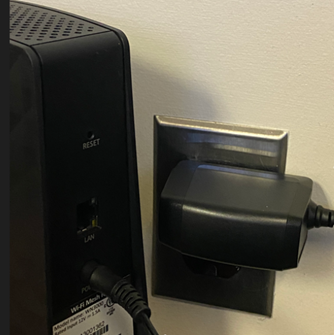
To avoid electric shock, turn OFF the modem by disconnecting the power adapter from the wall outlet.
Connect the cable to the modem and hand tighten the screw on the IFL cable until it is firm into the “SAT” port, as shown in the images below:
A Mesh Wi-Fi Node is the perfect solution to extend your modem’s signal throughout your home, for wall-to-wall Wi-Fi coverage. The Mesh Wi-Fi Node is specifically engineered to extend your Hughesnet® Wi-Fi signal for seamless browsing and streaming in every room.
The Mesh Wi-Fi Node pairs seamlessly with the Hughesnet HT3000W Wi-Fi Modem. Follow the Steps below to setup the Mesh Wi-Fi Node. The video below will also help you with activating the Mesh Wi-Fi Node.
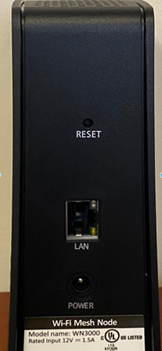
Step 1: Identifying Ports.
Take a moment to identify these ports on your device. On the back of the Mesh Wi-Fi Node, you will find the LAN port and Power Connector.
Step 2: Plugging in the Mesh Wi-Fi Node.
Once you have identified the ports, plug in your Mesh Wi-Fi Node to a power outlet using the provided power AC cable.
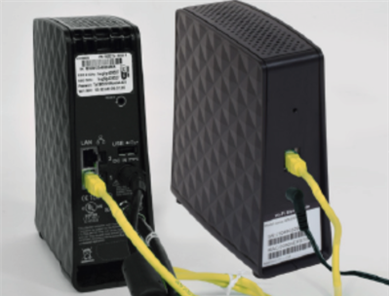
Step 3: Connecting Mesh Wi-Fi Node to Your Modem.
Using the provided ethernet cable, insert one end of the cable to the LAN port of the Mesh Wi-Fi Node. Connect the other end of the cable to any of the available LAN ports on the Hughesnet modem.
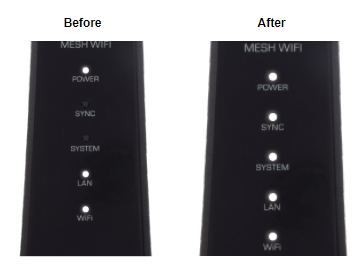
Step 4: Syncing with the Modem
After connecting the devices, you’ll need to wait for the LAN LED on your Mesh Wi-Fi Node to turn on solid, indicating a stable connection. Watch the SYNC LED on the Mesh Wi-Fi Node, as it will blink for about one minute while syncing with your modem. When the SYNC LED is solid, it means the sync is complete.
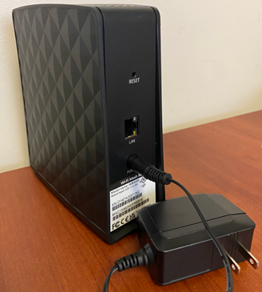
Step 5: Unplugging Mesh Wi-Fi Node.
The next step involves unplugging your Mesh Wi-Fi Node. Disconnect the Yellow LAN cable from the Hughesnet modem and your Mesh Wi-Fi Node. Disconnect the Power AC cable from the wall outlet. Leave the AC plug connected to the Mesh Wi-Fi Node.
Step 6: Mesh Wi-Fi Node Placement.
Proper placement of your Mesh Wi-Fi Node is essential for optimal performance. Find a location halfway between your Hughesnet Modem and an area with weak signal. Ensure that your Mesh Wi-Fi Node is in an uncluttered area and allows for proper ventilation. The Mesh Wi-Fi Node should be placed in an upright position.
Step 7: Testing Connection.
Once you’ve found the right spot for your Mesh Wi-Fi Node and placed it correctly, connect the device to a power outlet. Wait for the power lights to turn on and remain solid. After successful placement and connection, the Mesh Wi-Fi Node is now extending the Wi-Fi signal.
Congratulations! You’ve successfully set up your Mesh Wi-Fi Node. Add additional Mesh Wi-Fi Nodes to eliminate dead zones in your home.
Norton Utilities Ultimate is designed to delete hidden junk and duplicate files, put unnecessary apps to sleep, and uninstall leftover data to help get your Windows PC running smoothly again. It also helps improve your online privacy by removing obsolete web browser data and tracking cookies.
Some of the features include:
Free up your PCs capacity No more cluttered hard drives and system junk. Free up valuable storage space by deleting unnecessary files and applications.
Increase speed and performance Keep your computer running at its best by turning off processes, uninstalling programs, and fixing problems.
Performance at its best for longer Automated PC cleaning and optimization tasks help keep your computer running at peak efficiency.
Keep your online activity private Increase your online privacy by removing your browsing and download history and tracking cookies from your Windows PC.
Click here to login to your myHughesnet.com account to order.
For download and install instructions, click here.
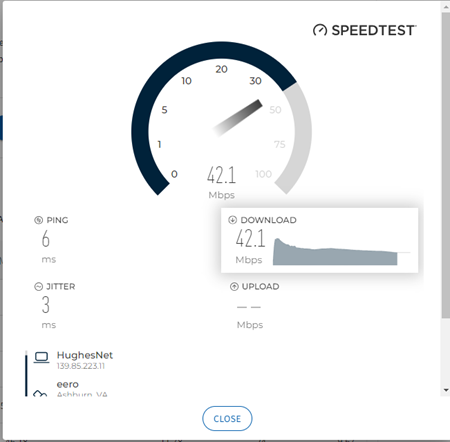
Speed Test allows you to measure your real-time network connection and provide details including real-time Download and Upload speeds. You can do a speed test from myhughesnet.com and from your myHughesnet (Mobile) app.
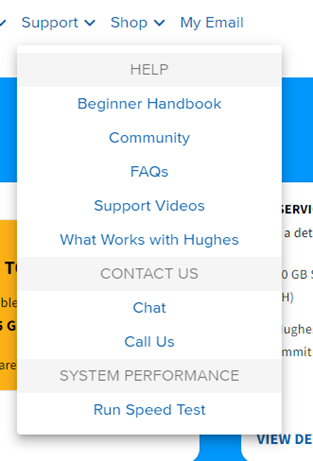
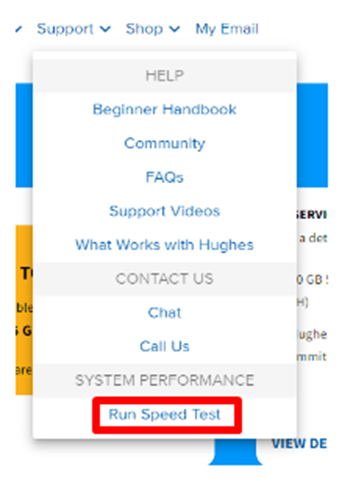
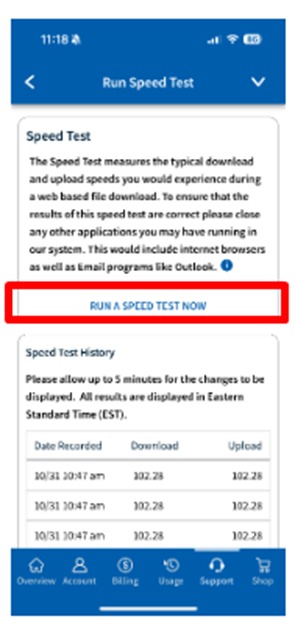
After logging into myhughesnet.com, select the Support tab on the tab and select “Run Speed Test.”
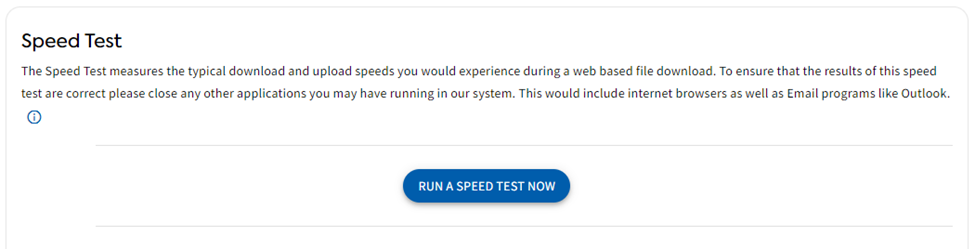
You will be taken immediately to the Speed Test Page. At the top, you will be able to run a speed test by clicking the button “Run a Speed Test Now.” To ensure the results of the speed test are correct, make sure to close any other applications or website tabs that you may have running on your system. Once your programs and any browser sites are closed, you may click the button to initiate the test. The test will take no more than 30 seconds.
The Test will initiate and connect to a server to start the test. Let the test run until it’s complete.
The results will run in real-time and post the speed in Mbps.
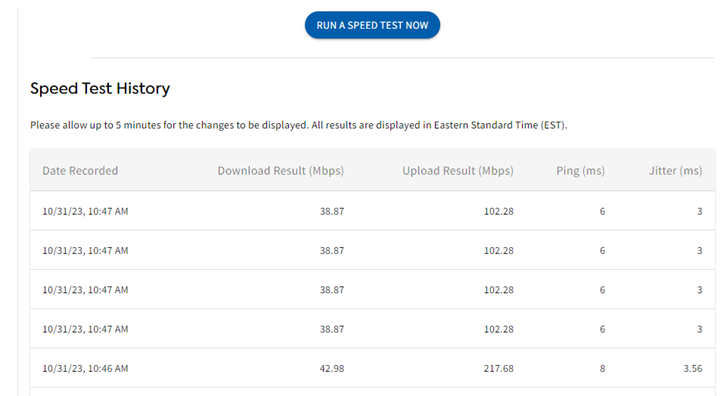
When the test is complete, the results will be posted. When you close the current speed test, The results will also be posted on the Speed Test History found on the same Speed Test Site. Please Note: The date and time recorded is displayed in Eastern Standard Time.
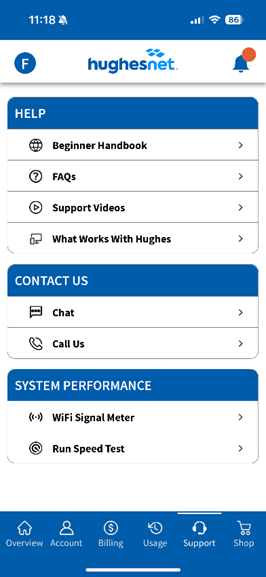
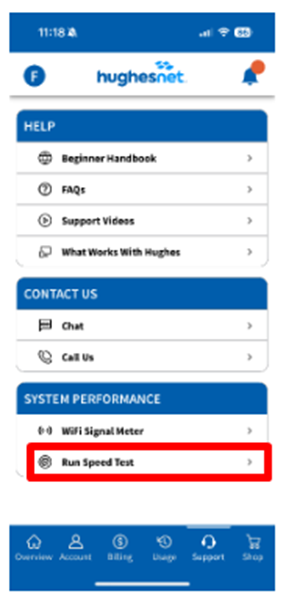
On the myHughesnet (Mobile) App, you can access the Speed test tool by navigating to the Support tab. The Speed Test option can be selected under “System Performance” on the bottom of the page.
The Speed Test will initiate when “Run Speed Test Now” is selected. Make sure to follow the instructions on the screen before beginning the test. Speed Test history will display the last few speed tests performed.
Here is what to expect at your installation visit.
Technician tracking:
Once the technician is en-route to your location, you will receive a Techtrak link via SMS. You can use this link to track the whereabouts of your installer. If you haven’t already registered, you can sign up for a free myhughesnet.com account. With your account, you can schedule or reschedule the installation, track the technician’s location, check your order status, and more.
Prepare:
Prior to the technician arriving at your home, think about where you would like your modem to be, and have the closest power outlet accessible. Keep in mind that it is best to keep the modem in a location with good airflow, at least six inches away from the wall. Also, ensure that someone 18 years or older will be present for the duration of the installation.
The installation generally takes between two and four hours.
What to expect at your appointment:
Location
Work with your technician to find the best outdoor dish location.
Install
The technician will install your satellite dish outside your home and run a cable inside your home directly to your modem. If you ordered Hughesnet® Voice, have your telephone and cable available.
Activate
After installation, you need to activate your Hughesnet services.
What is included with a professional installation?
1) The Hughesnet professional technician will install the Hughesnet Wi-Fi Modem (with power supply) and will connect 2 of your devices, such as:
desktop computer (connected to the modem with a Hughesnet supplied LAN cable)
laptop
tablet (Apple iPad, etc.)
smartphone
You can ask your technician to connect additional devices for an additional cost. Any non-standard installation extras will be billed on your next Hughesnet invoice. The technicians do not accept cash or check at the time of installation.
2) A Hughesnet outdoor antenna system (reflector, radio, and mount) will be installed on your roof or a wall at a location with a clear line of sight to a satellite in the southern sky and at least 4 feet off the ground so that it is out of reach of small children. If not, the technician will look for a pole mount option (additional fee may apply). For homes with vinyl siding, metal siding, or metal roofs, the technician may recommend a pole mount. Customers can request a pole-mounted dish installation as opposed to a roof-mounted installation when the technician arrives. Keep in mind a roof-mounted installation may provide the best long-term line of sight for optimal performance. If being installed on an outer wall or roof, the equipment needs to be accessible with a 25-foot ladder for quick and easy servicing should it ever be required. If a pole mount is required or requested, you will be billed a $50 pole mount fee on your next Hughesnet invoice. Pole mount installations include up to 25 feet of soft ground cable trenching. 3) Up to 125 feet of RG-6 cable will be run from the outdoor antenna to the modem inside through a drilled hole through the exterior wall to an adjacent interior wall. It will be terminated on the inside wall with a faceplate. 4) A grounding block is provided and the entire system is grounded to an NEC-approved bonding point. 5) All outdoor penetrations and water-resistant compression fitting are weather-sealed.
Can the certified Hughesnet technician hook up my home network?
Your technician will connect 2 of your devices during your installation appointment. However, you can ask your technician to connect additional devices for an additional cost.
Your technician will also offer to check your wireless strength using a signal gauge throughout your home to ensure you have coverage in every room. If your signal is weak in certain locations of your home due to the size, layout, or construction materials used, they may recommend a Mesh Wi-Fi Node to extend your wireless signal. This extender is specifically engineered to work with Hughesnet and delivers a strong, reliable Wi-Fi signal across your home for seamless browsing and streaming. If you purchase a Mesh Wi-F Node from your technician, the cost of the device and installation will be added to your next Hughesnet invoice.
After Installation:
Register
If you haven’t already registered, please make sure to create your free account on myHughesnet.com. This account provides access to various tools, including the ability to change plans, sign up for alerts and notifications, make payments, manage your devices, and more. For on-the-go access, you can download the free myHughesnet (Mobile App) Android | iOS. To receive a direct link to download the app to your phone, simply text ‘APP’ to 75720.
Survey
We strive to be a 5! Customer surveys are sent to ensure quality installations. If at any time during the installation, you don’t feel that the service provided qualifies as “5-stars,” please stop the installation and share your concern with the technician.
What non-standard installation items are not covered?
Customers sometimes want to enhance or customize their installation to specific requirements.
While they are not included in a Hughesnet standard installation, these enhancements may incur charges that will be added to your next Hughesnet invoice. All costs for non-standard work or equipment will be itemized by the independent Hughesnet technician on the Hughesnet Installation Reference Sheet and require your authorization signature before proceeding. Technicians do not accept cash or check at the time of install. These non-standard installation items include major customization on your Hughesnet system that would require the technician to:
Spend excessive time onsite to meet customer-directed requirements.
Purchase special materials, molding, or cosmetic hardware to hide exposed cables.
Remove, repair, or build structures to hide or support the Hughesnet System.
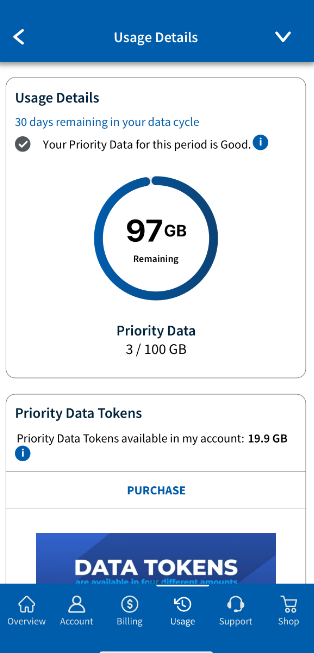
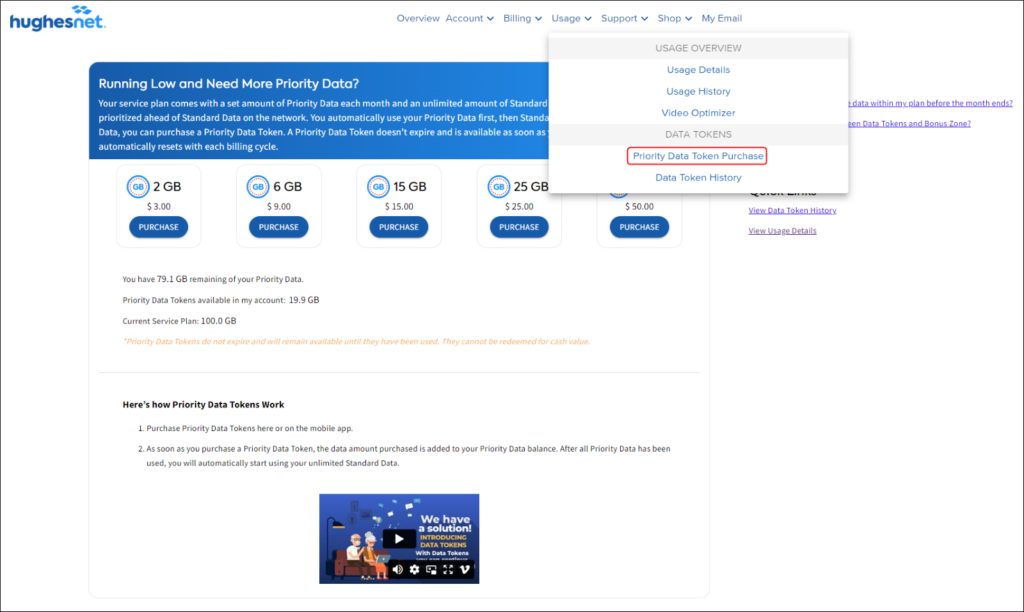
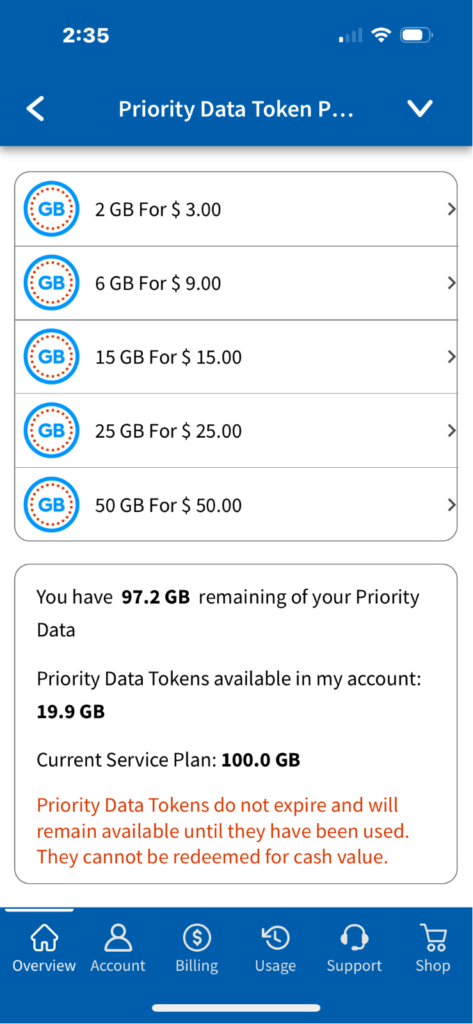
When logged into your account on myhughesnet.com, you can find the Usage panel on the home screen. The information displayed will contain details of your plan, including how much data is used and remaining for the month’s cycle. You can also view your available tokens and purchase additional tokens from the usage panel.
When “View Usage” is selected, you will be taken to the Usage Details page. There you will be able to view how many days are remaining in your data cycle.
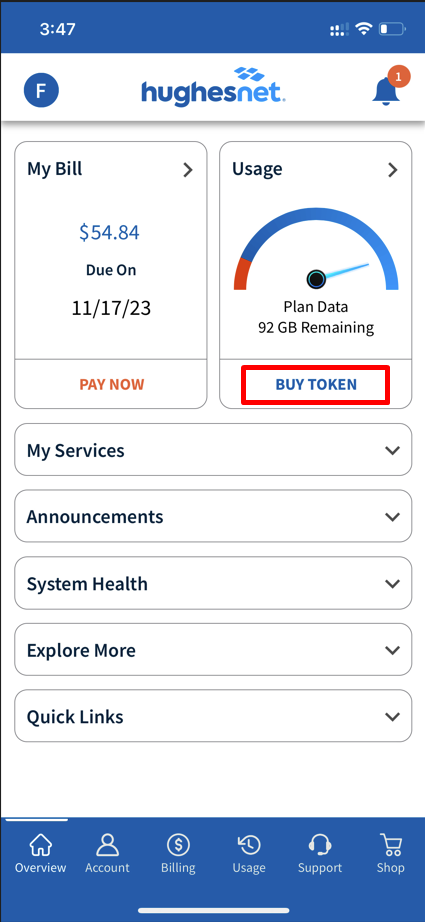
On the myHughesnet (Mobile) App, the option to view Usage will be shown on the Overview tab. The information displayed will show how much plan data is remaining for the month’s cycle. You can also buy Tokens from there. You will be able to view the same details as myhughesnet.com on the myHughesnet (Mobile) App.
Everything you do online uses data. How much data you use depends on the activity you are doing online. Data is transferred two ways: from the satellite to your computer (download) and from your computer to the satellite (upload). Here are some helpful links to learn more about Hughesnet®.