The self-activation/replacement guide for your HT3000W modem can be found here.
What to do if my Hughesnet modem state code is 102.6.2?
Ensuring your Hughesnet equipment functions properly is essential for maintaining optimal performance.
Verify the issue:
- Visit systemcontrolcenter.com from a device connected to your modem.
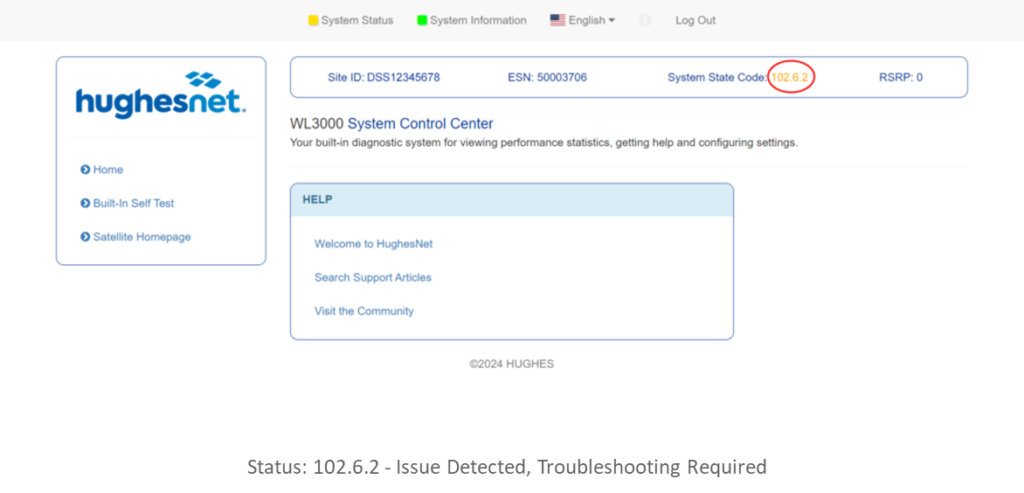
- If the state code displayed is 102.6.2, please continue with the troubleshooting steps below.

Troubleshooting steps (if state code is 102.6.2):
- Step 1 – Unplug the power supply of your Hughesnet modem and the Multipath device (WL3000) from the wall/electrical outlet or the power strip to prevent the risk of a short circuit or electric shock.
- Step 2 – Remove the SIM Card: Eject the SIM card by gently pressing it inward from the back of the multipath device until it pops out.

- Step 3 – Reinsert the SIM Card: Carefully take out the SIM card and then reinsert it. A “click” sound will confirm that the SIM card is properly secured.

- Step 4 – Reconnect the Power Supply: Plug the modem and the multipath device back into the power supply. Please wait for the devices to completely turn ON (usually takes a couple of minutes). Once powered ON, all LEDs on the multipath device should illuminate steadily.

- Step 5 – Confirm the issue: Using a device connected to your Hughesnet modem, visit systemcontrolcenter.com and check the state code.
- If the state code is still 102.6.2, please call Hughesnet Customer Support.
- If the state code is 0.0.0 or 24.1.1, the issue is resolved.
How can I improve my gaming experience?
This FAQ will guide you through troubleshooting common gaming issues to help enhance your gaming experience. Use the hyperlinks below to navigate to specific sections or scroll down for detailed instructions.
- Q: Why is my game download taking so long? What can I do to improve download speeds?
- Q: How can I reduce lag while gaming?
- Q: I keep getting disconnected from my game. How can I fix this?
- Q: My game won’t connect. What steps should I follow?
Q: Why is my game download taking so long? What can I do to improve download speeds?
There are multiple factors that can affect game download speeds, such as network congestion, download file size, and your data plan. Here are steps to improve download performance:
- Check Your Data Usage:
If you’ve exhausted your Priority Data allowance, you will automatically be switched to using your Unlimited Standard Data, which may result in slower speeds during peak traffic periods.- Log in to your myHughesnet account to check your current usage.
- If necessary, consider upgrading your plan or purchasing additional Priority Data tokens to improve speeds.
- Optimize Your Connection:
- For optimal performance, connect your gaming device directly to the Hughesnet modem via a LAN cable instead of Wi-Fi.
- Check Wi-Fi Signal Strength:
If your console is far from the modem (e.g., on the other side of the house), this can degrade the signal. Our mobile app features a Wi-Fi test that can assess the quality of the connection at your current location. If the signal is weak, consider purchasing an optional Wi-Fi extender or Mesh Wi-Fi Node to improve Wi-Fi coverage. - Cloud-based gaming on platforms like Xbox generally results in higher latency compared to playing games locally installed on your console. Whenever possible, download the game to your console for a smoother experience.
- Schedule Downloads: For faster downloads, consider scheduling them overnight between 2 a.m. and 8 a.m. when network congestion is typically lower. Please note, however, that speeds during this period are not guaranteed and may vary based on various factors.
- Rest Mode: It is recommended to place your Console in “Sleep/Rest” during downloads, as this can help with background downloading.
- Most Consoles have a Sleep/Reset mode (sometimes referred to as “Instant-on” mode) which allows your console to download updates and games while it appears to be off. Here’s how you can enable it:
- For the Xbox Console
- Press the Xbox button on your controller to open the guide.
- Navigate to Profile & system > Settings > General > Power options.
- Select the Sleep option.
- For the PlayStation Console
- Press the PlayStation button on the controller to launch the quick menu.
- Navigate to the power option.
- Select “Enter Rest Mode”
- For the Xbox Console
- Most Consoles have a Sleep/Reset mode (sometimes referred to as “Instant-on” mode) which allows your console to download updates and games while it appears to be off. Here’s how you can enable it:
- Consider turning OFF devices when not in use: As all devices connected to the network, share the available bandwidth, consider turning them OFF or disconnecting them from the network, so that your download activity is prioritized.
- VPN Usage: If you are connected to a VPN, be aware that it can reduce your home network speed by up to 75%, which will significantly impact download performance. Disconnect from the VPN if possible while downloading large files.
Q: How can I reduce lag while gaming?
Gaming lag is often caused by high network traffic or weak connections. Below are steps you can take to minimize lag:
- Disconnect Devices from the Internet when not in use:
- Disconnect any devices not currently in use from your network to free up bandwidth for gaming.
- Use a LAN connection between your console and the Hughesnet modem for a more stable, faster experience. Wi-Fi is often less reliable for gaming, especially if multiple devices are connected.
- Connect to Hughesnet Modem directly: Ensure your gaming device is connected directly to the Hughesnet modem, not through a third-party router, for optimal performance.
- Adjust DNS Settings:
Follow these steps to update the DNS settings, which may reduce lag:- Visit systemcontrolcenter.com while connected to your Hughesnet internet.
- Go to Wireless settings.
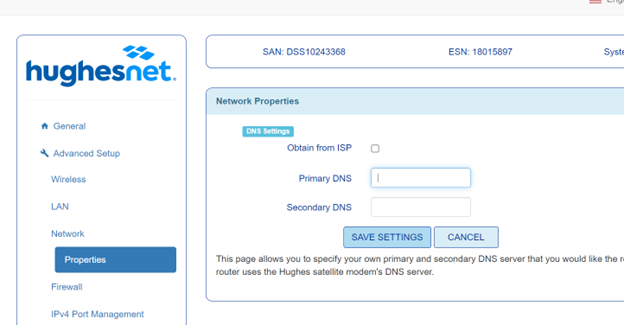
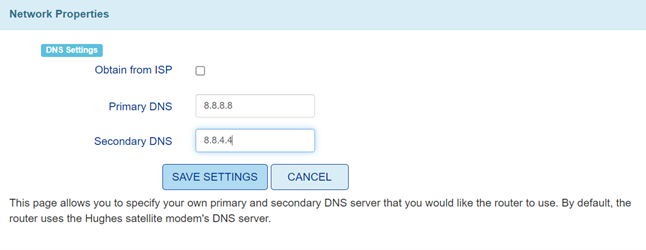
- Navigate to Advanced Setup > Network > Properties.

- Uncheck Obtain from ISP.
- Enter the following DNS:
- Primary DNS: 8.8.8.8
- Secondary DNS: 8.8.4.4
- Click Save Settings.

In the event that the above DNS settings did not help to resolve the lag issue, please try the following alternate DNS settings:
- Primary DNS: 1.1.1.1
- Secondary DNS: 1.0.0.1
Q: I keep getting disconnected from my game. How can I fix this?
Frequent disconnections can stem from several issues, such as poor Wi-Fi signals or game server outages. Use the following steps to troubleshoot:
- Check Wi-Fi Signal Strength:
Ensure your console is receiving a strong Wi-Fi signal. If your console is located far from the modem, try switching between the 2.4 GHz and 5 GHz Wi-Fi channels for better performance.- For the best results, connect your console directly to the Hughesnet modem using a LAN cable.
- If you continue to experience disconnections, you may want to purchase a Wi-Fi extender or a Mesh Wi-Fi Node to strengthen your Wi-Fi connection.
- Check Game Server Status:
Use tools like DownDetector to verify whether the game server is experiencing issues.- Additionally, most games or game developers offer a dedicated server status page where you can check the overall status of the game’s servers. Visiting this page will provide higher-level insights into whether any server-wide outages or issues are affecting your connection.
- Ensure Proper Direct Connection:
Verify that your gaming device is connected directly to the Hughesnet modem. Avoid routing your connection through third-party routers, as this can introduce additional points of failure.
Q: My game won’t connect. What steps should I follow?
When your game fails to connect, the issue could be with your network, system, or the game itself. Here’s how to resolve it:
- Check Your Network Connection:
Make sure your device is connected to a strong Wi-Fi signal, or better yet, use a LAN cable for a more stable connection. - Update Your Console and Game:
Ensure both your console and the game are updated to the latest versions. Consider scheduling these updates during off-peak hours (between 2 a.m. and 8 a.m.) to minimize download times. However, note that actual speeds may vary due to various factors. - Check Game Server Status:
Verify whether the game’s servers are experiencing downtime by visiting websites like DownDetector. Game Server issues may prevent you from connecting, even if your internet connection is functioning normally. - Direct Modem Connection:
Ensure your console is connected directly to the Hughesnet modem for the most reliable connection. Avoid using third-party routers or other network devices for optimal performance.
Where can I find installation guide for my Norton Subscriptions?
If you have already placed an order for a Norton optional service, you can use the links below to download the installation guide.
To access the guide for your Norton 360 subscription, click here.
To access the guide for your Norton Small Business subscription, click here.
To access the guide for your Norton Utilities Ultimate subscription, click here.
What are the minimum system requirements for Norton Utilities Ultimate?
With Norton Utilities Ultimate, you can speed up your Windows PC and free up valuable storage space by removing unneeded apps, programs, and leftover data. You will also enjoy increased online privacy through the removal of temporary browser files and cookies that advertisers can use to track your behavior.
While the application is designed to enhance performance across a variety of systems, it’s important to keep in mind that not all configurations are supported.
Please review the minimum system requirements information below:
Minimum Microsoft Windows OS Requirements
- Windows fully compatible PC with Intel Pentium 4 / AMD Athlon 64 processor or above (must support SSE3 instructions)
- 1 GB RAM or above
Windows™ Operating Systems
- Microsoft Windows 7 (all versions) with Service Pack 1 (SP 1) or later.
- Microsoft Windows 8/8.1 (all versions). except Windows 8 Start screen.
- Microsoft Windows™ 10 (all versions), except Windows 10 on Arm, in S mode, Mixed Reality, Mobile, IoT, Starter, and RT editions.
- Microsoft Windows™ 11 (all versions), except Windows 11 on Arm, in S mode, Mixed Reality, Mobile, IoT, Starter, and RT editions.
Additional Hardware Requirements
- 1 GB of available hard disk space
- Optimal standard screen resolution no less than 1024 x 768 pixels
- Internet connection (to activate product and receive product updates).
Ready to enjoy a faster, cleaner, and more reliable computer experience today? Click here to learn more and order.
Disclaimer: No one can prevent all identity theft of cybercrime. Not all products, services and features are available on all devices or operating systems. NortonLifeLock, the NortonLifeLock Logo, the Checkmark Logo, Norton, LifeLock, and the LockMan Logo are trademarks or registered trademarks of Gen Digital Inc. or its affiliates in the United States and other countries. Windows is trademark of Microsoft Corporation.
What are Dead Zones, and how can I eliminate them?
What is a Dead Zone?
A Dead Zone is any area in your home where Wi-Fi coverage is weak or nonexistent, preventing devices from connecting to the internet or causing poor performance.
What causes a Dead Zone?
Dead zones occur when the radio waves from your router are blocked or disrupted. Common causes include:
- Obstructions: Thick walls, large metal appliances, and furniture.
- Interference: Wireless devices like baby monitors, security systems, and microwaves.
- Weak Signal: The router’s signal may be too weak, especially at the edges of its coverage area.
How do I eliminate Dead Zones in my home?
To eliminate dead zones and ensure optimal Wi-Fi performance throughout your home, consider adding a Mesh Wi-Fi Node/Wi-Fi Booster to amplify Wi-Fi signal to reach hard-to-cover areas like basements or attics or even a garage.

What are the Hughesnet Voice features?
What are the Hughesnet® Voice features?

Click here to view the Hughesnet Voice Features Guide.
How do I access my Hughesnet Voice Features?
Visit myhughesnet.com
- Click on the ‘Account’ on the top menu, then ‘Voice’
- Click ‘Manage’ to visit the ‘Voice Dashboard’

- Once you are in the Hughesnet Voice Dashboard, you will be able to access your Hughesnet Voice features.
How do I set up my Voicemail PIN Number?
- Dial *333 on the phone you are using for Hughesnet Voice
- When prompted to enter your PIN, enter 1234.
- You will then be prompted to create a new pin. Your voicemail is now setup.
How do I Access my Voicemail?
- Dial *333
- Enter the PIN you have created.
How do I Access Voicemail Messages and Settings?
- On the Hughesnet Voice Dashboard, click on the ‘Settings’ button for ‘Voicemail’.

Note: If you don’t find your ‘Voicemail’ widget, you can add it to your ‘Voice Dashboard’ by clicking ‘ADD SERVICE’ button on the top right corner of the page.

- If you want to use your own answering machine, you have the option to disable the voicemail feature by toggling the ‘Enable Voicemail’ to OFF.

How do I Forward Calls?
On the Hughesnet Voice Dashboard, toggle ‘Enable’ on ‘Forward All Calls’ widget and enter the phone number you want to forward the calls to. You can even customize the number of rings on your primary device, before forwarding the call to another number.

How do I Transfer my Phone Number to Hughesnet Voice?
- On the Hughesnet Voice Dashboard, enter the phone number you want to port, into the ‘Voice Porting’ widget.

- If the number can be ported, you will be presented with the port request form to submit the request to port your number.

- We highly recommend checking the ‘Key things to note’ section to avoid common errors when submitting the form which can expedite the processing of your port request.
For more information on transferring your phone number to Hughesnet Voice, click here.
How do I download the myHughesnet (TV) App for my Android TV?
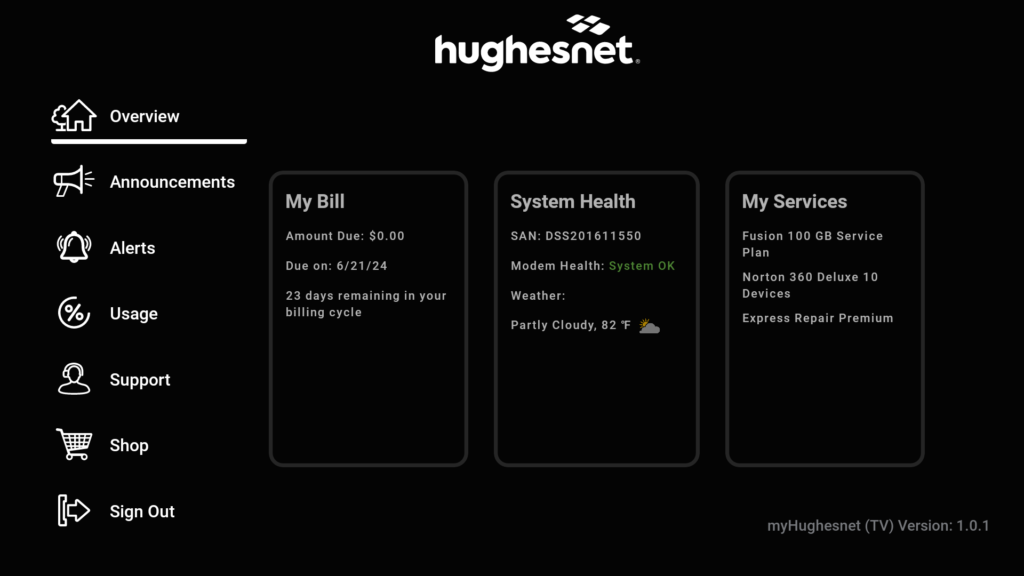
Enjoy the convenience of managing your Hughesnet® account directly on your TV with the new myHughesnet (TV) app for compatible Android TVs.
Download the App:
Step 1: Search for myHughesnet (TV) app Google Play Store on your Android TV.
Step 2: Download and install the app. Once installed, login using your myHughesnet.com account.

myHughesnet (TV) App Features Include:
Account Overview: Get a quick snapshot of your account information.
- My Bill: access your current bill amount, due date, and more.
- System Health: Check the health of your modem to receive optimal performance.
- My Services: Check the details of your subscribed services, including any optional services.

Access Alerts: Stay informed with important notifications and promotions.
Track Usage: Monitor your remaining data for the current cycle.
How do I download and install Norton Utilities Ultimate?
Boost your PC’s speed and performance with Norton Utilities Ultimate. Click here for download and installation instructions.
Unable to connect to System Control Center

It seems like you’re trying to access a URL that requires a Hughesnet connection.
Why do I need to be connected to Hughesnet internet to access this URL?
Some of our services are specifically designed to work with Hughesnet® to provide optimized, secure, and region-specific content. If you are seeing this page, it indicates that you are not currently connected via Hughesnet internet.
Please connect to your Hughesnet internet service and try accessing the link again.