For new Hughesnet® internet and Voice customers, on the day of installation your technician will arrive with the dish, the modem, and the Hughesnet Voice ATA (analog telephone adapter). The technician will install your internet service and set up and activate your Voice service. You will be required to accept the Voice Terms and Conditions prior to completing the Voice activation.
4 Ways To Use Your Security Cameras Without Using Up Your Data
Wireless surveillance cameras should provide peace-of-mind without the worry of exceeding your monthly internet data usage. Below we provide four recommendations to maximize the benefits of your home Wi-Fi security system and service plan data.
1. Use a lower resolution
Many security cameras on the market, including Nest Cam and Netgear Arlo offer both a high-definition (HD) and standard definition (SD) view. Select the SD setting to reduce bandwidth and storage.
See how to change Nest camera video quality.
2. Reduce frames per second (FPS)
A security camera only needs about 30 frames per second to capture good images. If your devices offer this setting reduce the frames per second.
3. Set record/upload intervals
Recording and uploading in real-time 24/7 will use a lot of your service plan data. Consider setting up your devices to sync at a set time once per day or use the motion/sound-based record function with a low sensitivity. Some products offer ‘mask’ areas or ‘Geofencing’ to avoid false recording motion in designated zones in order to allow for movement from pets, fans, and windows. Learn about Arlo Geofencing.
When motion is detected most systems record 30-second video clips. Shorter video recording lengths use less data, and longer video recording lengths use more data.
4. Limit number of cameras
While it’s easy to install 10 or more cameras in your home, consider that too many video streams will bog down a wireless router and degrade the performance of the security system overall and any other service or device that’s connected to the internet. Learn about Canary’s Wi-Fi requirements.
Wireless surveillance cameras troubleshooting tips:
If you experience any issues with your security cameras, refer to your product manuals first.
Visit speed test to determine if your internet connection meets the requirements of your wireless security system. Sign in to check now. You must be connected to your Hughesnet® modem.
If your device is too far from the router or you have dense wall materials in your home, you may benefit from a Wi-Fi extender, like the Hughesnet Wi-Fi Booster or Mesh Wi-Fi Node, to improve your wireless signal.
Hughesnet Terms and Conditions
Visit legal.hughesnet.com for Hughesnet® Terms and Conditions.
Can I Change My Service Plan?
If you have evaluated your internet usage and determined that a new service plan is right for you, you can easily switch your plan by logging in to your myhughesnet.com account or the myHughesnet (Mobile) App.
Changing your plan on myhughesnet.com
Register or Sign In to myhughesnet.com and click ‘Account’ at the top of the page, then ‘My Services & Plan’ and then ‘Change Plan’.

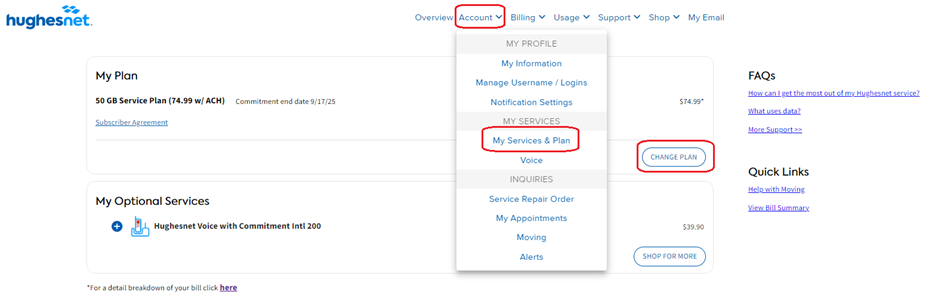
The following page will display your current plan and the other plans available to you. Select the plan that suits you and complete the checkout. Changes will be prorated on your next invoice.
Changing your plan on myHughesnet (Mobile) App
Once you are logged in to the myHughesnet (Mobile) App, click ‘Account’ on the bottom menu to see ‘My Services & Plan’.

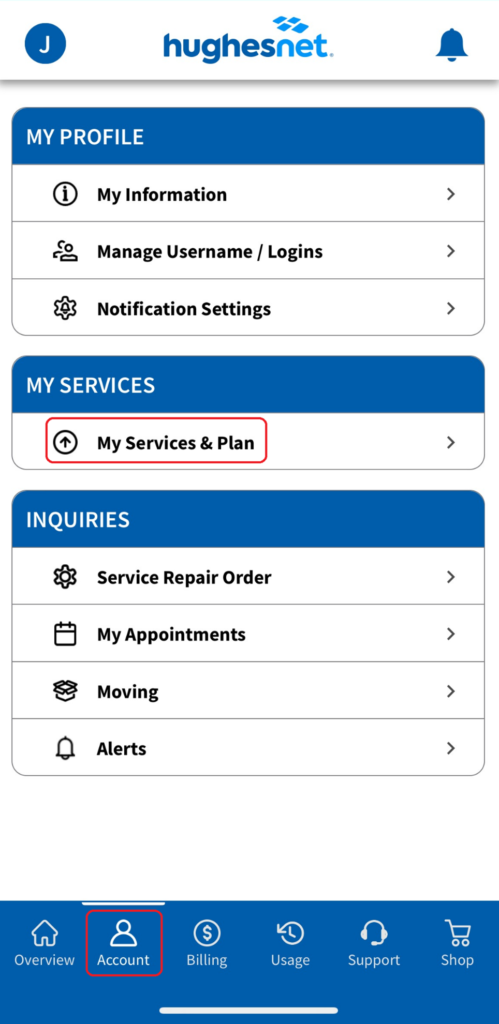
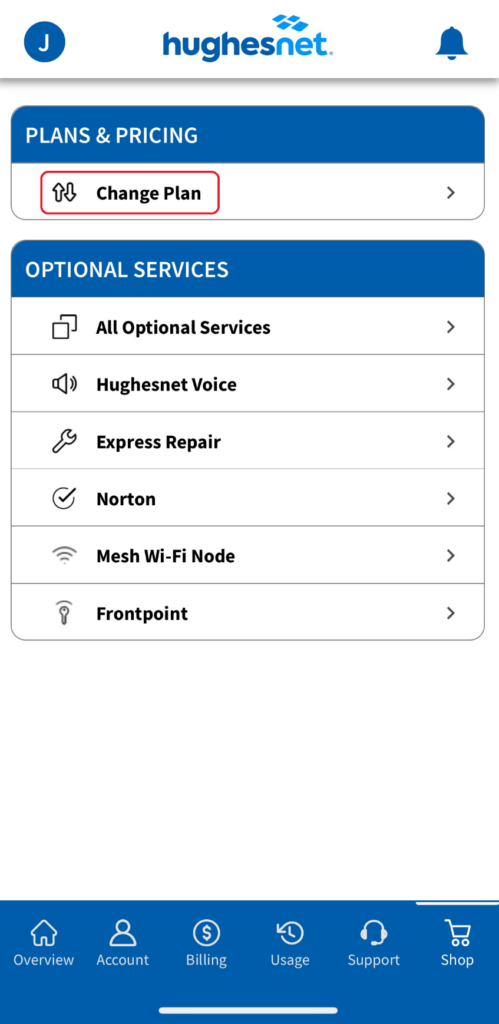
Click on ‘My Services & Plan’ > ‘Change Plan’ to see your current plan and the other service plan offerings available for you. Simply select a plan and click ‘Purchase’.

If you have questions about your service plan or changing your plan, contact Customer Care at 866-347-3292.
What do I need to know about Hughesnet rebates?
Am I eligible for a rebate?
If you purchased through a participating authorized Hughesnet® Dealer or Sales agent, you may be eligible for a rebate. Residential customers can review their first Hughesnet invoice to find the rebate code. If you have a code, go to hughesnetrebates.com and complete the form to claim your rebate. A rebate may only be claimed once per Hughesnet account and per address.
How do I qualify?
Review the terms and conditions for qualification on the rebate form during your purchase period.
- You must have invoices for 2 months of paid service.
Please Note: It is required to submit ALL pages of each monthly invoice. We need to receive BOTH the summary AND the itemized pages showing services purchased for each monthly invoice to verify your eligibility. - Rebates apply only to new Hughesnet subscribers. Upgrades and new activations on used equipment do not qualify.
- Your account must be in good standing at the time of rebate submission.
- Duplicate requests will not be honored or acknowledged. Review all Terms and Conditions at hughesnetrebates.com
How long does it take to receive a rebate once I submit the claim form?
Allow 8-10 weeks for rebate fulfillment from submission of rebate materials.
How are rebates issued?
Rebate will be paid in the form of a prepaid Mastercard® card. Cards are issued by Sunrise Banks N.A., Member FDIC, pursuant to a license from Mastercard International Incorporated. Mastercard is a registered trademark of Mastercard International Incorporated. The card may be used everywhere Mastercard debit cards are accepted. Registration, activation, acceptance, or use of this card constitutes acceptance of the terms and conditions stated in the Prepaid Card Agreement. Cards expire 6 months from date issued.
How do I print my first two Hughesnet invoices?
- Sign in or Register your account on myhughesnet.com
- After signing into your account, click on ‘Billing’ in the top navigation, then select ‘Bill History’ in the drop-down menu.
- On the ‘Bill History’ click the ‘View’ button next to your invoices. At the bottom of your invoice click the ‘Print’ button. Print your most recent TWO invoices and include with your rebate submission.
IMPORTANT: Your first invoice will be generated and posted online within one (1) day of date of activation.
Your second invoice will be generated and posted online one (1) month after your date of activation.
How can I check the status of my Rebate?
Go to hughesnetrebates.com and select your original Hughesnet purchase date, then click on ‘Check Existing Claim’.
You will need to enter your claim number and the email address that you used when submitting the rebate.
Don’t know your Claim Reference number?
It can be found in a submission confirmation email from HughesnetPromotions@email-360insights.com
How can I check the balance of my Rebate card?
Go to hughesnetrebates.com and click ‘Card Balance’ on the bottom of the page. You will need to enter your card number to display your current balance.
What is Hughes’ Equipment Warranty?
Please visit the Hughesnet® legal site for warranty information by clicking here.
How do I Add a Wireless Router to my Internet Continuity Setup?
Adding a wireless router to your Hughesnet Internet Continuity setup:
- Purchase a wireless router of your choice.
- Attach the WAN/Internet port of your wireless router to Port 3 of the Automatic Failover Router (TP-Link TL-R470T+).
- The wireless router will obtain network configuration automatically after plugging in.
- Follow the instructions for your new wireless router on how to customize your SSIDs.
- Example shown below is an Asus Router
- Connect your wireless devices to your new wireless router’s SSID (e.g. “ASUS-5G”)
- On your wireless devices, ‘forget’ the existing SSIDs associated with your primary Internet provider and connect to your new wireless router.
- Devices connected to your new wireless router will benefit from the automatic failover functionality.
- You can connect to your primary internet provider’s existing wireless router/modem or Hughesnet HT2000W Modem for troubleshooting purposes. Be sure to forget the SSID afterwards, so your device automatically connects back to the new wireless router to benefit from automatic failover.
Where can I find my modem’s Admin and Wi-Fi password?
Where can I find my Wi-Fi password?
If you have a Hughesnet® Wi-Fi modem, you’ll find your wireless (Wi-Fi) password printed on the sticker on the back of the device.

Changing your Wi-Fi password
It’s easy to change your Wi-Fi password. First you must access the System Control Center. The System Control Center provides access to system status, configuration information, and online documentation. To open the System Control Center, follow these steps:
1. Open a web browser such as Chrome, Firefox, or Internet Explorer.
2. Type www.systemcontrolcenter.com in the address bar and hit Enter. (You must be connected to your Hughesnet Modem to access the site)
3. Click the Wi-Fi Settings link on the left side of your screen.

- On the Login page, enter the “Administrative Password”.

Note: The default admin password is “admin.” Enter this password in the dialog box and click Login.
5. Once you have logged in, you will see the Wi-Fi Settings home screen.
6. You will see your existing password written in the Password field. To change it, delete the existing one and type a new password. Pick something easy to remember but hard for others to guess. Finally, click ‘Save Settings’ and exit the System Control Center.
Related FAQs:
Click here to access the HT2000W Modem user guide.
How Do I Pair My Device(s) To My Hughesnet Modem?
- See the back panel of the Hughesnet® modem. Look for the sticker pictured below:

- The SSIDs and the passwords for both the 2.4GHz and 5GHz networks are listed.
- Using the device you wish to pair, search for either of the two wireless network matching the SSID above.
- Connect to the network.
- When prompted for a password, enter the password exactly as it appears on the label on the back of the modem, referenced above.
Should I Update To A Browser With TLS 1.3?
What is TLS?
TLS is an acronym for “Transport Layer Security” and it establishes a secure, reliable, and private connection. TLS is important to keep your data safe, your online payments secure, and to keep your devices safe.
Why do I need TLS 1.3?
Many services, such as PayPal, strongly encourage TLS 1.3 for transactions and soon many sites will require it to display properly. The bottom line is that TLS 1.3 will help you keep your data protected.
Does my Browser use TLS 1.3?
Older versions of browsers do not support TLS 1.3 and should be updated. Browsers that support TLS 1.3 are Google Chrome 29 and greater, Apple Safari 7 and greater, Mozilla Firefox 57 and greater, and Microsoft Edge.